最初はサンプルアプリでも作ってみながら、
どんな風にアプリが作れるのかみてみると良いと思います(^0^)/
自分もサンプルアプリとして作成したアプリの中で、
今後もどこかで使えるだろうと思える機能や処理を紹介していきたいと思います。
ここでは、プログラムで描画した背景とコードを載せて、
背景画像を切り替えるサンプルアプリを例に紹介していきます。
アプリ
サンプルアプリをリリースしていますので、よかったらお試しください(^0^)/♪
背景パターン
現時点で作成している背景は7つあります。・水玉模様(隙間少なめ、グラデーションあり)
・チェック柄(モノクロ)
・多数の丸(カラフル)
・多数の四角(カラフル)
・フラットデザイン文字入り(カラフル、半透明)
・フラットデザイン文字入り(カラフル、透過なし)
・フラットデザインの市松模様(カラフル)
パターンごとに画面図とコードを紹介していきます。
パターン1:水玉模様(隙間少なめ、グラデーションあり)
drawOvalで単純に丸を描画していきます。
ループ中に色を計算して丸に色をつけます。
   public void DrawBackground001(Canvas csCanvas)
   {
    Paint csPaint = new Paint();
    RectF sOval = new RectF();
    for(int x=0; x<=320; x+=10)
    {
     for(int y=0; y<=320; y+=10)
     {
      csPaint.setAntiAlias(true);
      csPaint.setARGB(255,x*255/320,y*255/320,(int)Math.log(x*y));
      sOval.set(x, y, x+10, y+10);
      csCanvas.drawOval(sOval, csPaint);
     }
    }
   }
パターン2:チェック柄(モノクロ)
こちらも単純に四角形を描画していきます。
モノクロのため、コードでは黒色の四角形のみ描画していて、
範囲20pxの中に左上と右下に10pxの四角形を描画してループしています。
   public void DrawBackground002(Canvas csCanvas)
   {
    Paint csPaint = new Paint();
    RectF sRect = new RectF();
    for(int x=0; x<=320; x+=20)
    {
     for(int y=0; y<=320; y+=20)
     {
      sRect.set(x, y, x+10, y+10);
      csCanvas.drawRect(sRect, csPaint);
      sRect.set(x+10,y+10,x+20,y+20);
      csCanvas.drawRect(sRect, csPaint);
     }
    }
   }
パターン3:多数の丸(カラフル)
大小様々な丸に色をつけて描画しています。
ランダムな描画位置とサイズと色をセットして、32x32個の丸を描画させています。
(単純にパターン1とパターン2の使い回しのため(^^;))
   public void DrawBackground003(Canvas csCanvas)
   {
    Random rand = new Random();

    Paint csPaint = new Paint();
    RectF sOval = new RectF();
    for(int x=0; x<=320; x+=10)
    {
     for(int y=0; y<=320; y+=10)
     {
      int nX = rand.nextInt(320);
      int nY = rand.nextInt(320);
      int nSize = rand.nextInt(20)+1;
      csPaint.setAntiAlias(true);
      csPaint.setColor(Color.argb(rand.nextInt(256),rand.nextInt(256),rand.nextInt(256),rand.nextInt(256)));
      sOval.set(nX, nY, nX+nSize, nY+nSize);
      csCanvas.drawOval(sOval, csPaint);
     }
    }
   }
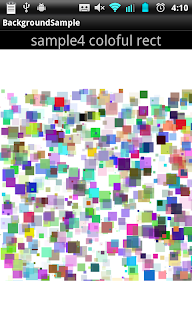
パターン4:多数の四角形(カラフル)
大小様々な四角形に色をつけて描画しています。
パターン3同様のソースで、drawRectに変更しています。
   public void DrawBackground004(Canvas csCanvas)
   {
    Random rand = new Random();

Paint csPaint = new Paint();
    RectF sOval = new RectF();
    for(int x=0; x<=320; x+=10)
    {
     for(int y=0; y<=320; y+=10)
     {
      int nX = rand.nextInt(320);
      int nY = rand.nextInt(320);
      int nSize = rand.nextInt(20)+1;
      csPaint.setAntiAlias(true);
      csPaint.setColor(Color.argb(rand.nextInt(256),rand.nextInt(256),rand.nextInt(256),rand.nextInt(256)));
      sOval.set(nX, nY, nX+nSize, nY+nSize);
      csCanvas.drawRect(sOval, csPaint);
     }
    }
   }
パターン5:フラットデザイン文字入り(カラフル、半透明)
今話題のフラットデザインを取り入れてみました(^^笑
ランダムな色の四角形を描画して、その中にランダムな大小の英字を表示しています。
public void DrawBackground005(Canvas csCanvas)
   {
    Random rand = new Random();

Paint csPaint = new Paint();
    RectF sRect = new RectF();
    for(int x=0; x<=320; x+=40)
    {
     for(int y=0; y<=320; y+=40)
     {
      csPaint.setColor(Color.argb(rand.nextInt(256),rand.nextInt(256),rand.nextInt(256),rand.nextInt(256)));
      sRect.set(x, y, x+40, y+40);
      csCanvas.drawRect(sRect, csPaint);
      int nTColor = -1 * csPaint.getColor() + Color.argb(255,0,0,0);
      csPaint.setColor(nTColor);
      csPaint.setAntiAlias(true);
      csPaint.setTextSize(24);
      String str = String.valueOf((char)((int)'A' + rand.nextInt(26)));
                  str += String.valueOf((char)((int)'a' + rand.nextInt(26)));
      csCanvas.drawText(str, sRect.left+4, sRect.bottom-4, csPaint);
     }
    }
   }
パターン6:フラットデザイン文字入り(カラフル、透過なし)
パターン5より透明度がない分、色が濃くなりました。
コード自体、パターン5と同じで透明度をなくしています。
public void DrawBackground006(Canvas csCanvas)
   {
    Random rand = new Random();

Paint csPaint = new Paint();
    RectF sRect = new RectF();
    for(int x=0; x<=320; x+=40)
    {
     for(int y=0; y<=320; y+=40)
     {
      csPaint.setColor(Color.argb(255,rand.nextInt(256),rand.nextInt(256),rand.nextInt(256)));
      sRect.set(x, y, x+40, y+40);
      csCanvas.drawRect(sRect, csPaint);
      int nTColor = -1 * csPaint.getColor() + Color.argb(255,0,0,0);
      csPaint.setColor(nTColor);
      csPaint.setAntiAlias(true);
      csPaint.setTextSize(24);
      String str = String.valueOf((char)((int)'A' + rand.nextInt(26)));
                  str += String.valueOf((char)((int)'a' + rand.nextInt(26)));
      csCanvas.drawText(str, sRect.left+4, sRect.bottom-4, csPaint);
     }
    }
   }
パターン7:フラットデザイン市松模様(カラフル)
市松模様に様々な色を付けています。
サンプル2の四角形を大きめに描画して色を付けたような形ですが、
コード上は隙間をあけて1つずつ四角形を描画しています。
   public void DrawBackground007(Canvas csCanvas)
   {
    Random rand = new Random();

Paint csPaint = new Paint();
    RectF sRect = new RectF();
    for(int x=0; x<=320; x+=40)
    {
     for(int y=0; y<=320; y+=40)
     {
      if((x+y)%80==0){
       csPaint.setColor(Color.WHITE);
      }else{
          csPaint.setColor(Color.argb(255,rand.nextInt(256),rand.nextInt(256),rand.nextInt(256)));
      }
      sRect.set(x, y, x+40, y+40);
      csCanvas.drawRect(sRect, csPaint);
     }
    }
   }
Activity側のソースコード
背景画像をタップすると次のパターンの背景に切り替わるようにしています。
public class MainActivity extends Activity
  {
      static public final int KIND_NUM = 7;
      int m_nBackKind = 0;

    /** Called when the activity is first created. */
      @Override
      public void onCreate(Bundle savedInstanceState)
   {
          super.onCreate(savedInstanceState);
          setContentView(R.layout.main);

    SetBackground(0);

    ImageView csView = (ImageView) this.findViewById(R.id.backImageView);
    csView.setOnClickListener(new OnClickListener()
    {
      @Override
      public void onClick(View p1)
      {
       // TODO: Implement this method
       m_nBackKind++;
       m_nBackKind%=KIND_NUM;
       SetBackground(m_nBackKind);
      }
    });
   }

   public void SetBackground(int nKind)
   {
    Bitmap csBmp = Bitmap.createBitmap(320,320,Bitmap.Config.ARGB_8888);
    Canvas csBmpCanvas = new Canvas(csBmp);
    ImageView csView = (ImageView) this.findViewById(R.id.backImageView);
    switch(nKind)
    {
    case 0:
        DrawBackground001(csBmpCanvas);
        break;
    case 1:
        DrawBackground002(csBmpCanvas);
        break;
    case 2:
        DrawBackground003(csBmpCanvas);
     break;
    case 3:
        DrawBackground004(csBmpCanvas);
        break;
    case 4:
        DrawBackground005(csBmpCanvas);
        break;
    case 5:
        DrawBackground006(csBmpCanvas);
        break;
    case 6:
        DrawBackground007(csBmpCanvas);
        break;
    }
    csView.setImageBitmap(csBmp);

    String[] strArrayStr = getResources().getStringArray(R.array.ary_samples);
    TextView csTView = (TextView) findViewById(R.id.titleTV);
    csTView.setText(strArrayStr[nKind]);
   }


 :
 :
 :

  }
あんまり背景としては使いにくいものもあったかと思いますが、
何かで応用していただければと思いますm(_ _)m
Canvasクラスを使えば、読み込んだ画像にも描画できますので、
画像を効率的に処理する上でも便利です。
また、今回のようなコードを使えば、アプリで画像データを用意しなくても、
背景画像を描画できるので、満足できる背景が作れれば、アプリの容量を削減できますね(^_^)v
(それが難しいのかもしれませんが…( ̄▽ ̄;))
今回紹介した背景以外にも様々な背景がプログラムでかけると思いますので、
機会があればまた別の背景を作成してサンプルを紹介していければなと思います(^-^)
この記事の続きはこちら↓
【アプリ開発】画像ファイルなしで画像を作る②
ソースの公開
(追記:2014/08/13)
GitHubでBackgroudSampleのプロジェクトを公開しました(^^)
実際にソースを利用したい方はこちらをご利用ください☆
❏BackgroudSample


0 件のコメント:
コメントを投稿